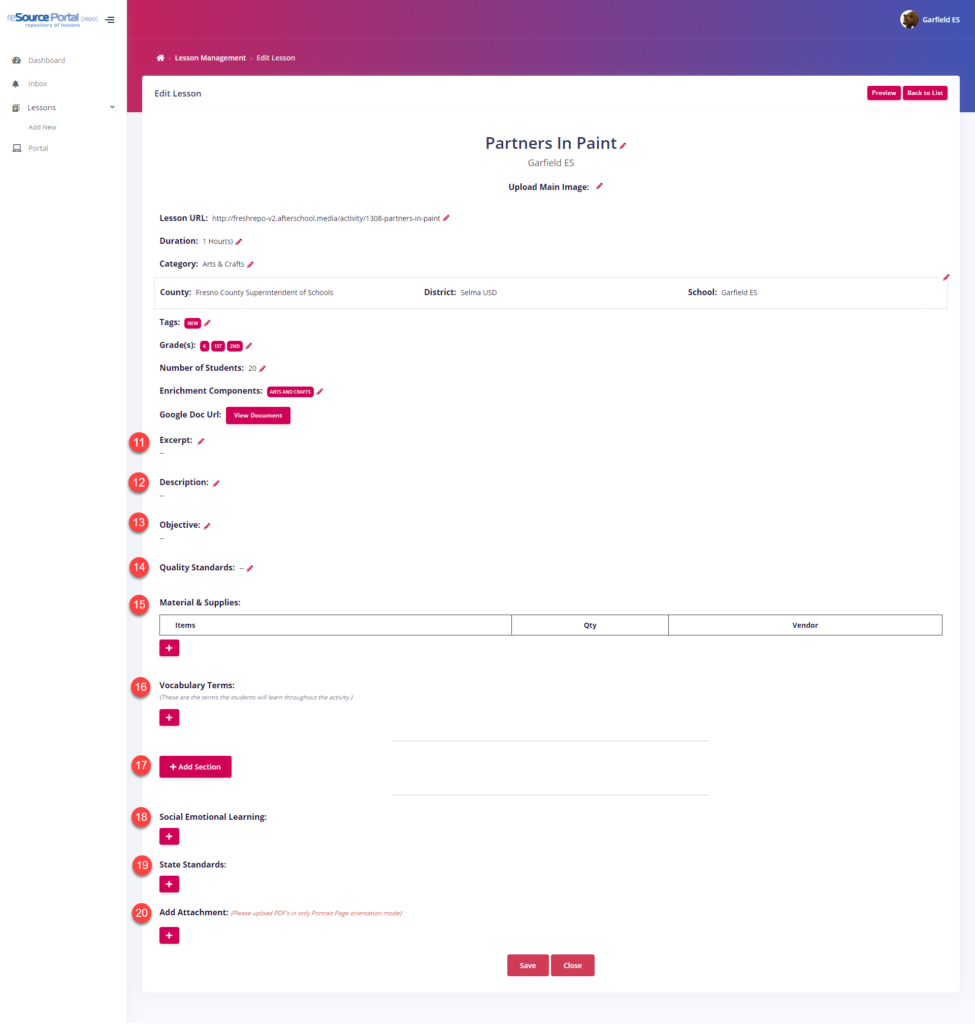
If you look at the numbering, we started at 11. This may look confusing but it actually is the continuation of the initial creation of the lesson plan; Adding Lesson Plans.
Initially, after adding the lesson plan, you will be directed to the Edit Lesson plan page where you can continue setting up the lessons.
- Excerpt - This field provides an overview of the lesson and will be displayed in the lesson plan card together with the Main Image. This field must contain up to 180-200 characters, use this tool for character count. To update the lesson excerpt, follow the instructions below:
- Find the Excerpt field and click the Pencil icon beside it.
- The field will be enabled for editing. Enter the excerpt in the field.
- After adding the Excerpt, click the Save icon.
- Description - This field enables you to add a brief lesson plan description. The description must answer the question “What is the lesson about”. This field must contain 30-50 words. To update the lesson description, follow the instructions below:
- Find the Description field and click the Pencil icon beside it.
- The field will be enabled for editing. Enter the lesson’s description.
- After specifying the description, click the Save icon.
- Objective - This field lets you add the lesson’s objective. 15-20 words that explain the things that you want to accomplish as you do your lesson. To update the lesson objective, follow the instructions below:
- Find the Objective field and click the Pencil icon beside it.
- The field will be enabled for editing. Enter the lesson’s objective.
- After updating the objective, click the Save icon.
- Quality Standards - This field shows a framework of clear expectations and a vision of quality. To define the quality standards, follow the instructions below:
- Find the Quality Standards field and click the Pencil icon beside it.
- The field will be enabled for editing. Click the field to display the list of quality standards.
- Select the appropriate quality standards that you want to add. You can add multiple quality standards by selecting from the list.
- Active and Engaged
- Diversity, Access, and Equity
- Healthy Choices and Behaviors
- Safe and Supportive Environment
- Skill Building
- Youth Voice & Leadership
- After adding the quality standard(s), click the Save icon
- Materials and Supplies - This field enables you to add the materials needed for the lesson’s activity. It allows you to specify the material name and photo/PDF, quantity, and vendors (if applicable). To add materials and supplies, follow the instructions below:
- Find the Materials & Supplies field and click the Plus (+) icon below the table.
- An item line will be enabled, specify the materials & supplies information:
- Item name
- To add an item image/pdf use the Browse button.
- Qty or Quantity
- Vendor
- Vendor’s website URL
- If you want to add more materials, repeat the process by clicking the Plus (+) icon. To delete an item, click the Minus (–) icon on the right part of the table.
- After adding the materials and supplies, click the Save icon.
Notes:
For materials that include attachments such as worksheets, activity sheets, and illustrations, just upload the PDF document. A hyperlink will be added to the item as you save the lesson plan.

In case the materials do not need to be purchased e.g. computer/laptop, table, chair, etc., leave the vendors blank. - Vocabulary Terms - This option allows you to add vocabulary terms that students will learn throughout the activity. A minimum of at least three terms entries. To add vocabulary terms, follow the instructions below:
- Find the Vocabulary Terms option and click its Plus (+) icon.
- An additional field will appear. In the Word field, enter the term.
- In the Definition field, enter the term’s definition.
- To add more terms, click the Plus (+) icon again and repeat the process.
- After adding the vocabulary terms, click the Save icon.
- Add Sections - Lesson plan contents vary and most of them follow this format:
- Preparation (Optional)
- Introduction (Optional)
- Activity Steps
- Clean Up
- Wrap-Up / Analysis
- Conclusion
The Add Section feature enables you to control the sections needed in your lesson plans and provides the ability to manually add the sections according to your requirements.
To add a section, follow the instructions below:
- Find and click the + Add Section button.
- The Activity Section section will appear. To rename the section, enter the appropriate section name in the Name field.
- In the Description panel, enter the activity section’s description. Use the Rich Text Formatting Tools to create an aesthetically appealing description by applying Bold, Italics, Numbering, and hyperlinks to text.
- To add media files, use the Select Any field and choose the type of media by clicking the appropriate button (a)Image, (b)Video.
- To add an image, click the Image radio button and click the Select Photo field. Upload the image file and click the Save icon.
- To add a video, click the Video radio button and paste the video’s hosting site (e.g. Youtube, Vimeo, etc.), and click the Save icon.
To add more media, click the Plus button and repeat the process.
If the section requires steps, follow the instructions below:
- Find and click the +Add Step button.
- The Step table will appear. In the first column, enter the textual instructions/steps. Use the Formatting tool to make the steps creative.
- To add media files, use the column on the right.
- To add an image, click the Image radio button and click the Select Photo field. Upload the image file and click the Save icon.
- To add a video, click the Video radio button and paste the video’s hosting site (e.g. Youtube, Vimeo, etc.), and click the Save icon.
- After adding the steps, click the Save icon.
Note:
- You can only add one type of media at a time.
- When selecting Image, the succeeding files should be all images.
- You can upload images in JPG and PNG formats.
- We also recommend using 700x500 px for all your images to look good in the frontend.
If you need both image and video in the same step, follow the instructions below:
- You can upload images in the 2nd column and just hyperlink the video in the rich text tool.
- In the second column, click the Image radio button and click the Select Photo field.
- The File Location window will appear, select the image file that you want to upload and click Open.
- In the first column, add the description of the steps. Embed the link of the video by copying the link from the hosting site (e.g. Youtube, Vimeo, etc.) and pasting it in the first column along with the description.
- Click the Save icon.
Tip:
- We recommend just use the ADD STEP feature if you are adding any media in every step.
- For Preparation and Introduction, just add the steps in bullets or a number list.
Preparation (Optional) - The preparation stage helps you provide an outline of what you will do and what you need to prepare for the activity which may include the preparation of materials to be used.
Introduction (Optional) - Introduce your lesson using a quotation, games, an overview of the lesson, or any form of motivation. Make sure to take into consideration the learning styles of your target students so you can utilize teaching methods that would work well for everyone. The Vocabulary terms may also be discussed in this part.
Activity Steps
- You may include activities that encourage student-to-student, teacher-to-student, and student-to-teacher interaction in order to maintain your students’ interest all throughout the lesson. This will also enhance their relationship and communication skills.
- The Activity Steps contain two sections; one is for the written steps while the other is for the image or video showing or featuring what is on the written steps. Adding both image and video in one step cannot be done simultaneously, it is either an image or a video alone.
- The Activity Steps should have an image or video in order to provide clarity and to avoid confusion. Make sure to include only ORIGINAL pictures, images, and/or illustrations. If these are unavailable…You may download free stock images from the following sites:
Videos to be added must be uploaded and embedded on YouTube.
Clean Up - Teach and help the students to foster responsibility and cleanliness.
Wrap Up / Analysis / Conclusion - A quick summary of the concepts and ideas discussed in the lesson is a way to end it. You may also give them a preview of what the next lesson will be.
- SEL (Social Emotional Learning) - This option enables you to add social-emotional learnings. These learnings are the emotional aspects the students learned in the activity. To add social-emotional learnings, follow the instructions below:
- Find the Social Emotional Learnings option and click its Plus (+) icon.
- An additional field will appear, click the field to display the learnings and select from the drop-down list:
- Growth Mindset
- Self-Awareness
- Self-Efficacy
- Self-Management
- Social Awareness
- Interpersonal Skills
- In the Description field, add a brief description of social-emotional learnings.
- To add more learnings, click the Plus (+) icon again and repeat the process.
- After adding the social-emotional learnings, click the Save icon.
- Common State Standards - This option lets you add common state standards. It is worth noting that state standards may differ based on the County’s State Standards. To update the common state standards, follow the instructions below.
- Find the State Standards option and click its Plus (+) icon.
- An additional field will appear, click the field to display the state standards and select from the drop-down list:
- English-Language Arts
- History
- Mathematics
- Physical Education
- Science
- Social Students
- Visual and Performing Arts
- Other
- In the Description field, add a brief description of the standard.
- To add more standards, click the Plus (+) icon again and repeat the process.
- After adding the state standards, click the Save icon.
- Add Attachment - This option lets you upload additional PDF documents to your lesson. Ensure that the PDF you document is in portrait orientation. If the file is larger than the accepted size, you use this tool to compress the PDF document before uploading the file. To attach files to your lesson, follow the instructions below:
- Find the Add Attachment option and click its Plus (+) icon.
- The Add PDF field will appear, click the field to open the File Location and select the PDF file that you want to upload.
- After selecting the file, click the Open button in the File Location window to start uploading the file.
- If you want to add more attachments, repeat the process by clicking the Plus (+) icon. To delete an attachment, click the Minus (–) icon on the right part of the field.
- After adding attachments, click the Save icon.
Was this article helpful?
That’s Great!
Thank you for your feedback
Sorry! We couldn't be helpful
Thank you for your feedback
Feedback sent
We appreciate your effort and will try to fix the article